

DUO Authentication Proxy: Securing our Meraki VPN with 2FA
Because saving your VPN credentials on your device isn't that smart.

My name is Brandon, and I currently work as an Information Technology Consultant in the Atlanta metropolitan area.
I am not a developer, but I enjoy learning about cloud and data center technologies. I also technically own "Brandon's Cloud, LLC" as my own consulting company.
I did this project a while back and am now just writing this up.
PROBLEM: The current Meraki Client VPN OS configuration allows users to save their login credentials to their devices. This can be very problematic, from a security standpoint, because a compromised device could have direct access to your corporate environment using those saved credentials.
SOLUTION: Duo integrates with your Meraki Client VPN to add two-factor authentication to any VPN login. In a nutshell, it forces users to use a secondary form of authentication (Duo), via the Duo Authentication Proxy, when connecting to your Meraki Client VPN. This provides you that added layer of security.
How does it work?
Here is how it works:
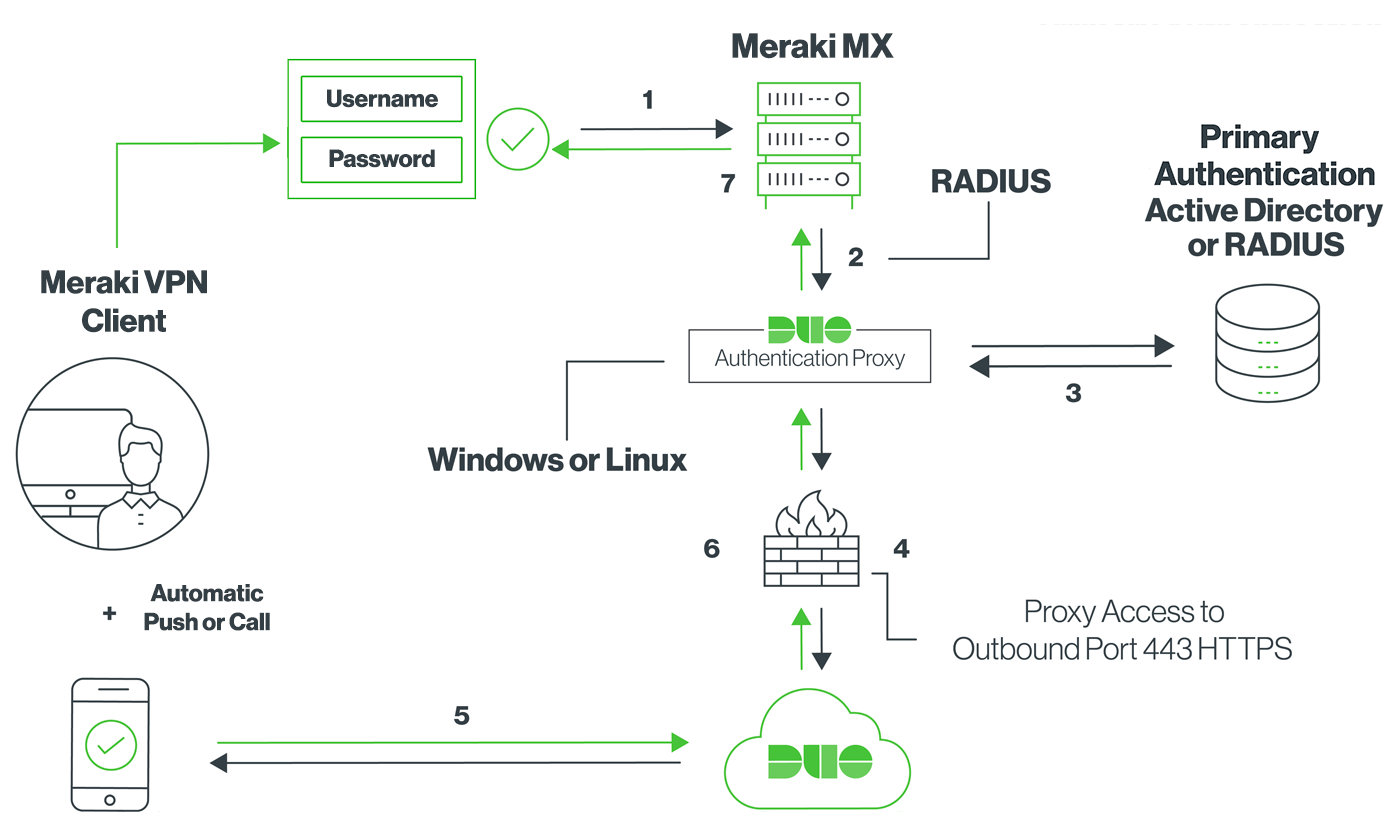
- Primary authentication initiated to Meraki Client VPN
- Meraki MX sends the authentication request to the Duo Authentication Proxy
- Primary authentication using Active Directory or RADIUS
- Duo Authentication Proxy connection established to Duo Security over TCP port 443
- Secondary authentication via Duo Security’s service
- Duo authentication proxy receives the authentication response
- Meraki Client VPN access granted
Install the Duo Authentication Proxy
For this to work, the organization must configure the Duo Authentication Proxy on one of the following systems:
- Windows Server 2012 or later (Server 2016 or 2019 recommended)
- CentOS 7 or later
- Red Hat Enterprise Linux 7 or later
- Ubuntu 16.04 or later
- Debian 7 or later
Regardless of the OS that you chose, Duo recommends a system with at least 1 CPU, 200 MB disk space, and 4 GB RAM (although 1 GB RAM is usually sufficient).
In my corporate situation, I have our Duo Authentication Proxy installed on a “miscellaneous” Windows server that runs a few different services. The proxy doesn’t utilize a significant amount of computing resources. Therefore, I didn’t think that we should deploy the Duo Authentication Proxy on its own server. It was also the first Duo application I deployed, so I was slightly hesitant to do it on a Linux server.
But before installing and configuring the Duo Authentication Proxy, I needed to contact Meraki Support to have the Client VPN RADIUS Timeout value increased to 60 seconds. This is important because it gives the user plenty of time to receive and respond to the Duo Push notification.
Configuring the Proxy
Now this took me a little bit of time to configure. The configuration file is formatted as a simple INI file. Following the Duo documentation made things a little easier though. I ended up using Active Directory/LDAP as our primary authenticator, utilizing a Read-Only Service Account to read the Active Directory service on my Domain Controller. The rest of the configuration was step-by-step.
Start the Proxy
Once you configure the INI file, the commands to start the proxy service actually check your configuration file for any errors as well as checks for connectivity to Duo. If you ever modify your configuration file, you must stop and restart the DuoAuthProxy service as well as restart the Authentication Proxy.
Configure Your Meraki VPN
You will then add the server, containing your configured Duo Authentication Proxy, to your list of RADIUS servers on the Client VPN section of your Meraki Cloud console. Following the Duo documentation makes this process relatively simple.
Testing Your Setup
I ended up testing my setup from home because I wouldn’t be able to connect to our Meraki VPN from inside the network. Technically I could have done it at the office using mobile hotspots but doing it from the comfort of my house made more sense.
Thankfully it worked out well and now I have enabled 2FA on our corporate VPN.


